If you need support for any products you have purchased from Weyfringe you can contact our product support department who will be happy to help get you up and running again as soon as possible.
Product support department hours are Monday to Thursday 8:15am - 4:30pm; Friday 8:00am to 3pm.
To contact us regarding product support please complete our product support form at any time or call 01642 490121 between the times shown above.
Product Support Topics:
Loading labels and ribbons
You have your label printer or applicator, now you need to know how to load labels and ribbons so you can start printing. Here we guide you through the label and ribbon guide path for some of our most popular printers. We will show you how to avoid some of the easy to make mistakes that can be the difference between being able to print clean crisp labels and not being able top print at all.
H plus series printer
Our most popular label printer is capable of using both inside and outside wound ribbons and accepts a label roll size of upto 203mm outside diameter. The video on the right shows you the label feedpath and the ribbon feed and rewind path and how they interact with the printhead.
DB4 applicator loading
The video on the right shows you how to feed a label roll around the printer and peel beak of a DB4 label print and apply applicator. With the DB4 feedpath being slightly more complex than a standard printer this guide will have you up and running quickly.
db4 threading from Weyfringe Labelling on Vimeo.
Printhead Replacement
Printheads are a consumable item and will, at some point, require replacing. Replacing the printhead can be a daunting task so we have put together the guides below to help you through this process for a selection of leading printer makes and models. Whenever you need to change the printhead before you begin always remember to switch off and unplug your printer. Failure to switch off the printer may result in irreparable damage to the new printhead and damage to the printer. If in doubt call 01642 490121 during office hours to speak to one of our service engineers who will be able to talk you through the process.
H Series Printhead Replacement
If you need to replace the printhead in a H series printer follow the instructions in the video to the right. Before you begin you MUST ENSURE THE PRINTER IS SWITCHED OFF. Replacing a printhead whilst the printer is powered up will cause irreparable damage to the new printhead and may cause damage to the printer.

-
Once the printhead carriage screw is removed, the printhead carriage will drop down and provide access to the printhead retaining screws
-
Remove the two printhead retaining screws

-
Remove the plastic printhead guard from beneath the printhead being careful not to pull out the label edge sensor cable from its fixed position. This will release the printhead from the carriage and will hang by the printhead cable.

-
Gently unplug the printhead from the printhead cable
-
Reverse these steps to install the new printhead

CAB A4+ Printhead Replacement
-
Switch off the power and unplug the printer
-
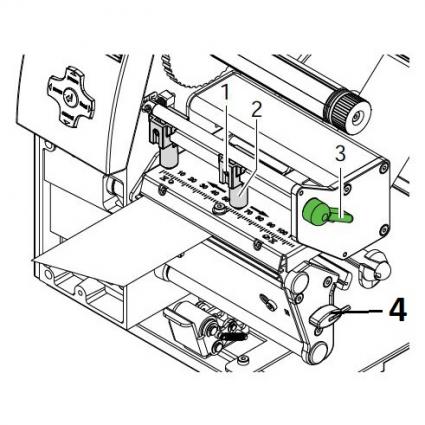
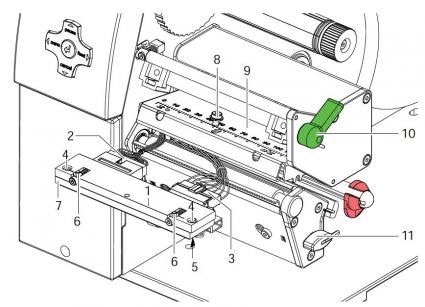
Lift the printhead using locking lever (10)
-
Remove labels and ribbons
-
Remove the Allen key from its retainer (11) and gently remove the screw (8) on the top of the printhead mounting bracket (9)
-
Lift the printhead mounting bracket and gently loosen the printhead connector cables (2,3) and remove the printhead once disconnected
-
To re-install connect the two printhead connector cables and reposition the printhead into the printhead mounting bracket so that the pins (6) are secured in the corresponding holes on the printhead mounting bracket (9)
-
Keeping the printhead mounting bracket lowered gently with one finger, screw in the retaining screw using the Allen key (8).
-
Reload labels and ribbons and you're ready to print
CAB Mach 4 Printhead Replacement
-
Switch off the power and unplug the printer
-
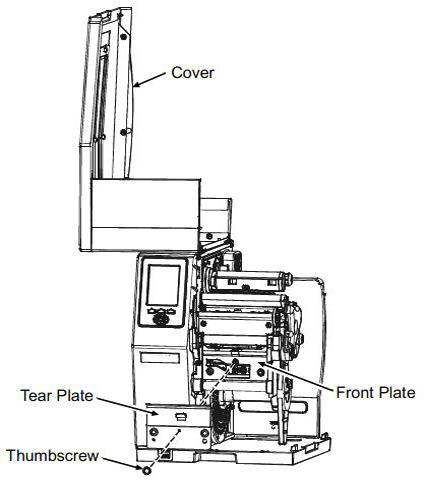
Open the cover and lower the hinged front panel, press the printhead release button to raise the printhead carriage assembly and remove labels and ribbon
-
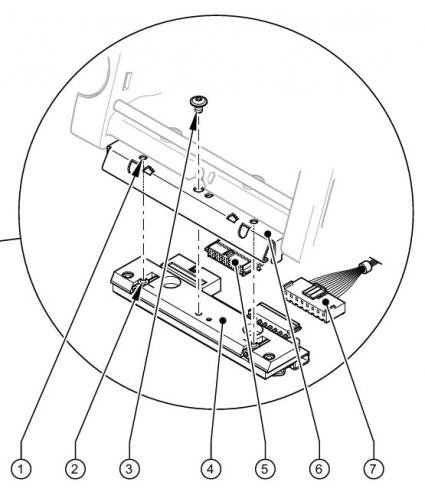
Remove the retaining screw (3) from the printhead carriage (6)
-
Remove the printhead cables (5,7) from the printhead (4)
-
To re-install attach the printhead cables (5,7) to the printhead (4)
-
Attach the printhead to the mounting bracket ensuring the 2 pins (2) on the printhead fit into the corresponding holes (1) on the printhead mounting bracket and fix in place using the retaining screw (3)
-
Replace labels and ribbon and lower printhead mounting bracket and press evenly on the marked areas until the unit clicks into place securely
-
Raise the front panel and you are ready to start printing again
-
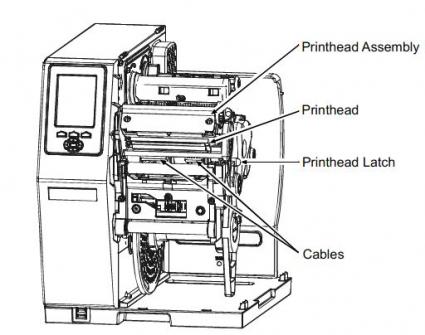
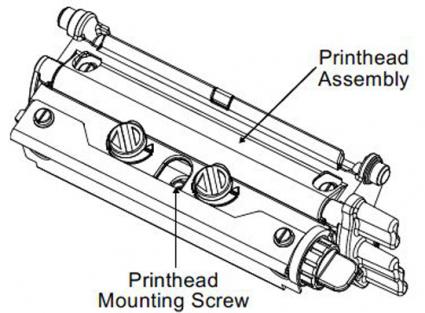
Loosen the captive screw of the printhead. When free, the captive screw will spring upward
-
Raise the printhead assembly. While supporting the printhead, carefully disconnect the cables and remove the printhead from the printer
-
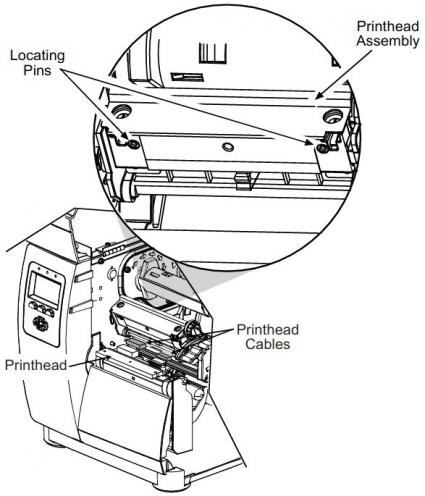
To refit, position the printhead under the printhead assembly and connect the cables. Place the printhead via the holes in the top surface onto the alignment pins of the printhead assembly.
-
Secure the printhead in position using the captive screw taking care not to over tighten
-
Reload your labels and ribbon and print a validation label to ensure the printhead is printing as usual
-
While carefully supporting the printhead raise the printhead assembly and disconnect the cables. Once disconnected remove the printhead from the printhead assembly
-
To re-fit, carefully connect both cables to the printhead and position the printhead onto the locating pins of the printhead assembly
-
Secure the printhead to the printhead assembly being careful not to over tighten.
-
Replace labels and ribbon and you are ready to print.
H Series Printers
White lines through printed label
This could be lines running vertically through the print or diagonal seemingly random lines.
If the lines are diagonal this could be ribbon crease due to the ribbon shield position. To adjust the ribbon shield position turn the screws at either end of the ribbon shield. It is recommended to only make a half turn at a time to prevent the shield from becoming so far out of position it is impractical to reset it yourself. If the lines are running diagonally bottom left to top right, turn the left hand screw clockwise. If the lines are running diagonally bottom right to top left, turn the right hand screw clockwise.
If the lines are vertical straight through the print this could be due to dirt on the printhead or worn heating elements. First try cleaning the printhead using Isopropyl Alcohol and a clean lint free cloth or a printhead cleaning card. If this does not remove the lines the printhead will need to be replaced.
Out of media or Check Media Gap Sensor error displaying on the printer display
If you see this error the label edge sensor of the printer requires re-calibration or the label edge sensor has moved and is unable to sense the labels.
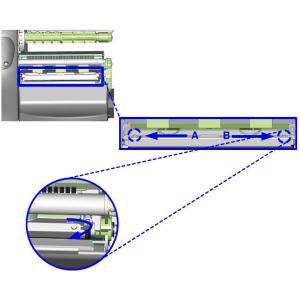
First check the label edge sensor is roughly in the centre of your labels as they feed through the printer. The label edge sensor is black with a white arrow to determine the sense location. It is positioned beneath the printhead and stretches across the label feed path. Turn the knob on the right hand edge of the printhead assembly to adjust how far in or out the label edge sensor sits on the label feed path.
If this does not fix your issue you will need to calibrate the label edge sensor. To do this switch the printer off and hold down the "FEED" button. Whilst keeping the button pressed switch the printer back on, holding the button until the printer beeps and displays "Auto-sensing Mode" on the display. The printer will now run a re-calibration to determine your label size. Once complete the printer will display the measured label height briefly and then should read "Ready to Print".
If neither of these actions fixes the issue there may be a component fault. In which case complete our product support request form and one of our engineers will contact you to discuss further possible fixes or advise of parts requiring replacement.


Out of ribbon or Check ribbon sensor error on the printer display
If you see this error appear on screen there are a number of things to try before assuming the ribbon sensor is faulty.
First check to make sure the ribbon rewind hub has a cardboard core installed. If the core is installed ensure the ribbon rewind blades are gripping the core and turning the roll. If the hub is spinning within the core the blades will need to be replaced.
If both of the above are present and working the ribbon sensor has developed a fault and will need to be replaced. If you wish to continue using your printer until a replacement sensor can be installed, set the labels to direct thermal through Easylabel printer settings which will bypass the ribbon sensor. This technique is not recommended as a long term alternative, only as a last resort as the printer will not stop printing when the ribbon runs out.

Poor print quality on the left or right edge of the label
If you are experiencing faint or missing print on the edges of your labels this is most commonly caused by the printhead pressure blocks being incorrectly positioned for the size of label being overprinted.
Adjust the pressure block so that an even amount of pressure is spread across the entire width of the printing area.

CAB A4+ Printers
White lines through printed label
This could be lines running vertically through the print or diagonal seemingly random lines.
If the lines are diagonal this could be ribbon crease due to the ribbon shield position. To adjust the ribbon shield position turn the Allen screw on the left hand side of the printhead assembly, as shown right. Turning the screw towards the + position will increase tension on the inner edge of the ribbon, turning the screw towards the - position will increase tension on the outer edge of the ribbon. It is recommended to make these adjustments whilst printing to see the effect in real time.
If the lines are vertical straight through the print this could be due to dirt on the printhead or worn heating elements. First try cleaning the printhead using Isopropyl Alcohol and a clean lint free cloth or a printhead cleaning card. If this does not remove the lines the printhead will need to be replaced.

Label edge fault/ label not found error
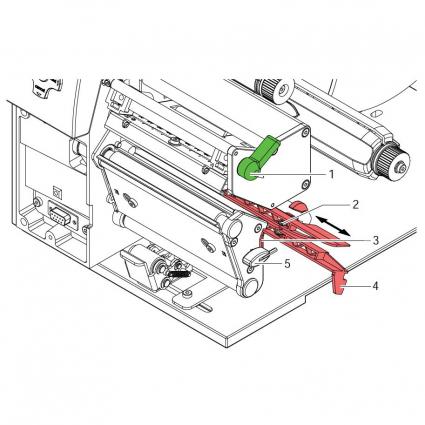
If the label edge sensor becomes blocked the printer will not be able to sense the edge of the label as it prints. First check the label edge sensor is properly aligned for the label you are printing. The label edge sensor should be roughly in the centre of the label. Second ensure it hasn't become blocked by any label or ribbon debris and clean the sensor. To do this press the latch (3) and use the tab (4) to slowly pull out the label edge sensor ensuring the cable is not strained. Clean the sensor unit (2) with a brush or cotton swab and pure alcohol. Push the label sensor back into the correct position. If this does not fix the issue the label edge sensor in your printer may have developed a fault. Call 01642 490121 during office hours to speak to one of our support engineers who will advise you of any action required.
Ribbon Fault errors
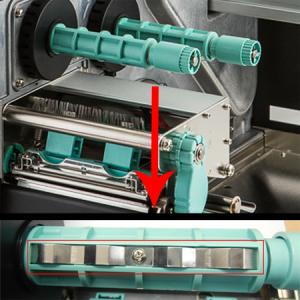
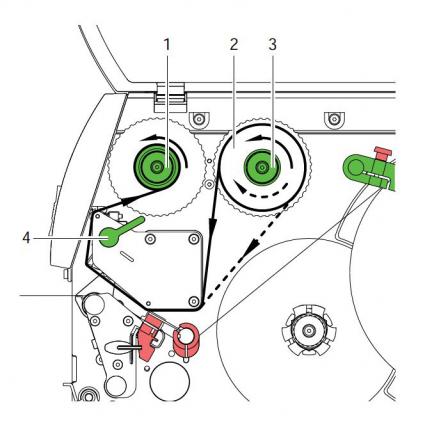
Ribbon fault errors include out of ribbon and remove ribbon fault displays. First ensure there is material remaining on the ribbon and the unwind and rewind ribbon core adapters are tightened so that they turn the ribbon with the core and the ribbon is fed as per the example on the right. If you use a heat setting too high there is a chance you could melt the ribbon, this will also display an out of ribbon error. In this case remove the ribbon, lower the heat setting through the software, clean the printhead with a cleaning card or a cotton cloth and IPA alcohol. Reload your ribbon and start printing at a lower heat. Another reason for ribbon errors is trying to print direct thermal with a ribbon installed. Printing direct thermal labels does not require a ribbon if you print direct thermal and thermal transfer labels you must remove and re-install the ribbon to suit.
Poor print quality on the left and right edges of the label
If you are experiencing faint or missing print on the edges of your labels this is most commonly caused by the printhead pressure blocks being incorrectly positioned for the size of label being overprinted.
Using the Allen key located at the right of the printhead assembly (4) loosen the screw in (1) in the outer pressure block (2) and position it at the outside edge of the label and re-tighten. If you still experience poor quality at the edges of your labels the drive roller may be worn or the printhead functioning incorrectly. Call 01642 490121 during office hours and one of our support engineers will discuss any action required with you.